Connect to server
This method has been superseded by our friends at ITS. They now install a program called CrashPlan on your work machine (I would give you a link to an ITS page describing this, but I can’t find one). CrashPlan backs up all your files all the time to a safe location. If you don’t see a little house with a grid of squares in the upper right side of your computer screen, call ITS and request CrashPlan. Don’t bother with the rest of this.
There are also a variety of synchronization services that you should consider: they ensure that different computers all have the same files. You have probably heard of Dropbox; it is free for a limited amount of storage. The college paid for a similar service called Box. It does the same thing (with minor differences, I expect) only without meaningful limits. And if you have the very newest (10.10) version of the Mac operating system, you can use a service called iCloud Disk that is run by Apple. It is free with your computer or iPhone. There are many more services in this category; they all have very low costs and typically have a free tier of service. They all ensure that your files are stored apart from your physical work computer.
Finally, physical disk drives are dirt cheap. Buy one, leave it plugged in, and do regular backups with SuperDuper or Apple’s Time Machine.
This page is about how to back up your computer to a disk on the Pomona College network. It’s addressed to faculty at Pomona who use Apple computers.** Students might start with this page to discover the differences.
Why? Hard drives fail and computers are stolen. One or the other will almost certainly happen to you. You can get a new computer, but you can’t replace your files. Of course, I’m not telling you anything you don’t know. Some of you even made back up copies … uh, four or five months ago, right?
We’re going to do much better. We’re going to set up your computer to copy your files every day, without any intervention on your part. Furthermore, the copies are going to go to a place where they can’t be stolen or harmed: a networked computer disk maintained by professional computer people.
If you follow my instructions, you will be able to accept computer failures or theft with a measure of equanimity. Doing so will cost you about $30 and 20 minutes of your time. It’s a bargain.
There are three steps.
You will need the following information.
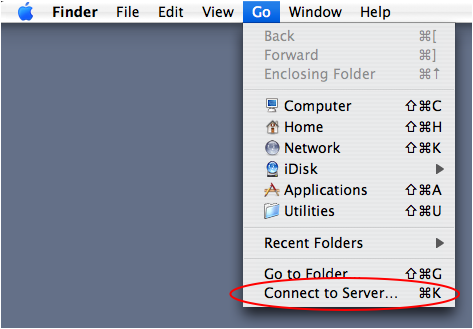
Click on the desktop. You will see these menus across the top: Finder, File, Edit, View, Go, Window, and Help. Under the “Go” menu, select “Connect to Server” (circled in red below).
Connect to server
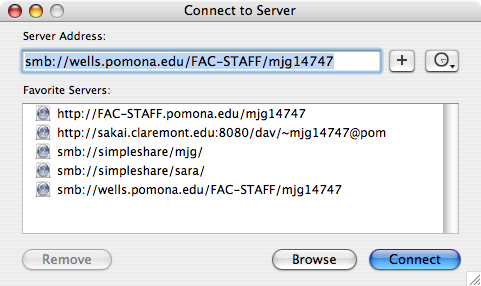
A window titled “Connect to Server” will open. In the “Server address” box, type (or copy and paste): smb://wells.pomona.edu/FAC-STAFF/
Then, right after that, add your username. It’s the part of your email address before the @ sign, a combination of your initials and the number 47. For example, my email address begins mjg14747. So I type this (see the blue highlighted part below): smb://wells.pomona.edu/FAC-STAFF/mjg14747
Enter server address
Press the button with the plus sign immediately to the right. That makes a kind of bookmark for this address that is helpful to have; it will make this address appear in the “Favorite Servers” box in this window.
Now, press the blue button that says Connect. Guess what that one does!
You will see a window that asks for your password. It’s the same password that you use for your email. The boxes in this window should be filled out like so:
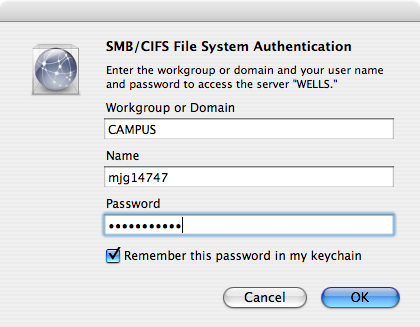
Enter password
If all goes well, you’ll see a gray icon that looks like a globe in a box with the name FAC-STAFF. That’s the server. You’ll also see a list of folders. That’s your account on the server.†† If the folders you see all have three letters plus 4747, find the one that is labeled with your username and open it. You are now able to save files to a computer in an entirely different building. Nifty, eh?
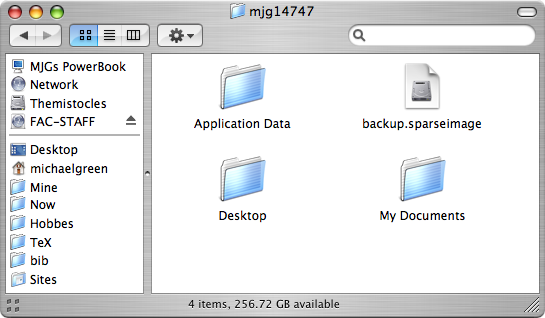
My server space
We’re going to use a program called SuperDuper!, so first we have to go get it. Follow that link and download SuperDuper! Then, put SuperDuper! into your Applications folder. Finally, start SuperDuper! just as you would any other program.
The next thing we have to do before starting in earnest is register SuperDuper! This is where your credit card does its part. Under the SuperDuper! menu, select Register… (circled in red) and follow the instructions.

Register SuperDuper!
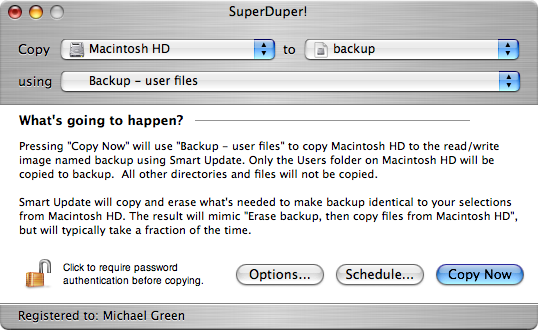
Now we’re going to set up SuperDuper! to copy your files.‡‡ This is all on page 18 of the User’s Guide. You can find the User’s Guide under the SuperDuper! Help menu. We need to answer three questions using the three drop-down menus in the SuperDuper! window: the first comes after the word “Copy”, the second after the word “to”, and the third after the word “using”.
What disk holds the files to be copied? Select the hard drive on your computer. It’s probably called “Macintosh HD”.
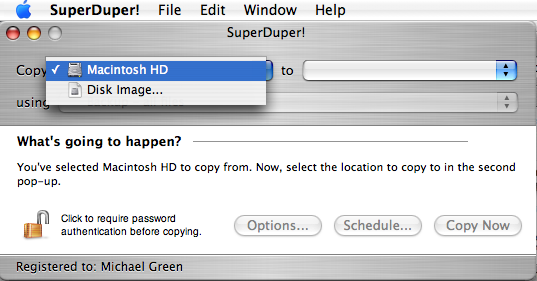
Select your hard drive
Where should those files be copied to? Select “Disk Image…”.
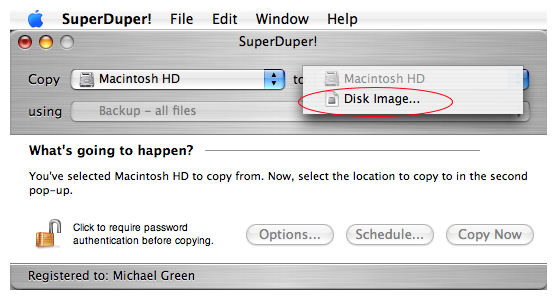
Select Disk Image…
You will be shown a dialog box that says “Save as”. The following should be selected: FAC-STAFF (highlighted in gray) and the folder with your username (highlighted in blue). This means the copies will be saved on the disk on the network.
Choose a name for your backup. I chose “backup”, but anything equally obvious will do. Now click Save.

Save the disk image on the server
What specific files should be copied? Under “Standard Scripts,” select “Backup – user files” (highlighted in blue).
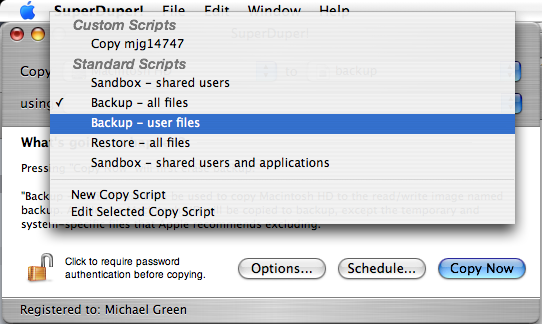
Choose a backup script
Finally, press the “Options…” button. Under “During copy” select, “Smart Update backup …” (circled in red). That means the future backups will only copy files that have changed, rather than everything. It’s a good thing.
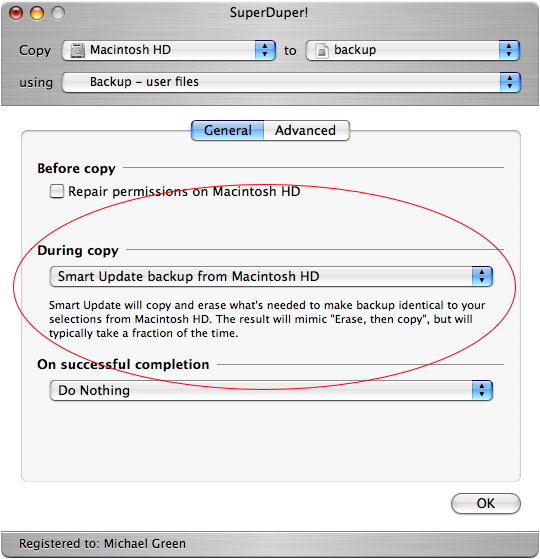
Select Smart Update
Press the OK button. You’ll return to the familiar SuperDuper! window pictured below.
SuperDuper! will tell you what will happen if you press the blue button that says “Copy Now”. If it makes sense, press the button. We’re backing up!
Copy now
This is going to take a while, so let me explain what we just did. When we answered the second question, we told SuperDuper! to save all of your files in one big file on the server. This big file will look like a disk to an Apple computer. We’re doing that rather than simply copying the files because the computer that runs the server has slightly different rules for its files than your computer does. The only way to keep the names the same, among other things, is to put them all in the one big file.
Our answer to the third question tells SuperDuper! to copy all of the user accounts on your hard drive. That means everything in your account, and any other account on your machine, will be copied. The operating system and programs, by contrast, won’t be copied. We’re leaving things out because space on the server is limited. These are the files that can’t be replaced if your computer is stolen or goes kablooey. We’ll take care of them and let ITS worry about the operating system and Microsoft Word.
Is it done yet? If so, let’s check to make sure everything worked. Double click on your backup on the network. For me, it’s the file called “backup.sparseimage”. You should see what looks like a new disk appear on your desktop. Open it up and see if you can open your files. It’s going to be slow, but it should work. If it does, you have now backed up your files. You are nearly done.
One last bit of business remains: telling the computer to back itself up without any intervention on your part. There are only two things to do, but we have to go through a lot of windows in order to do them.
First, we need to tell SuperDuper! its schedule. Click the Schedule button in the SuperDuper! window. Another window with a weekly calendar will pop up. We will use this to tell SuperDuper! when to copy your files. Pick a time that is fairly soon after you leave on a normal day. That way, each day’s work will be saved. For example, I catch a 4:30 train, so I have it copy at 4:47 every weekday.
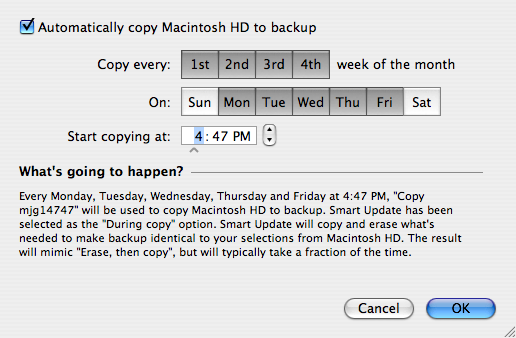
Schedule SuperDuper! copies
Second, we need to tell the computer to wake up just a bit before SuperDuper! is scheduled to do its thing. Otherwise, nothing will happen. To do this, select “System Preferences” (highlighted in blue) from the Apple menu in the upper-left corner of your screen.
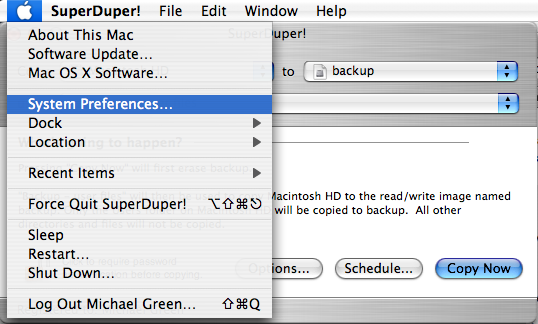
Open System Preferences
A new window will open. Select Energy Saver (circled in red).
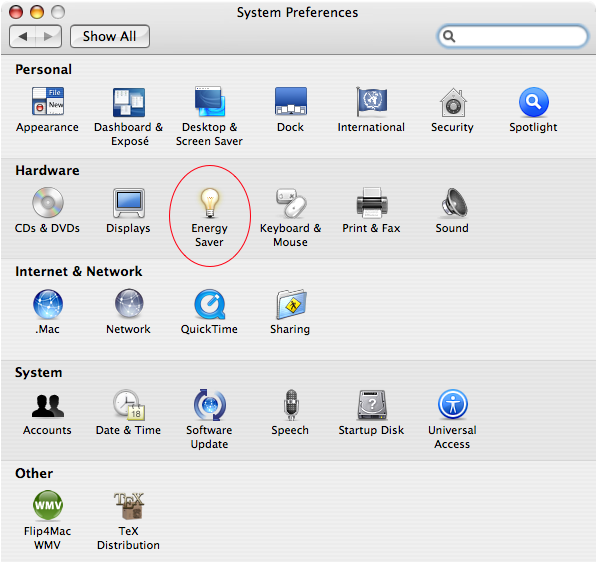
Select Energy Saver control panel
Yet another window; select Schedule (circled in red).
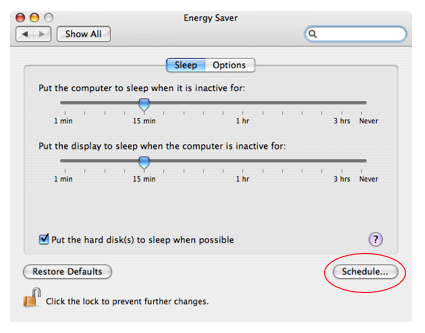
Select Schedule
And another window. Set the computer to wake up a couple of minutes before you told SuperDuper! to copy your files. For example, since my copies happen at 4:47, I have the computer wake up at 4:45.
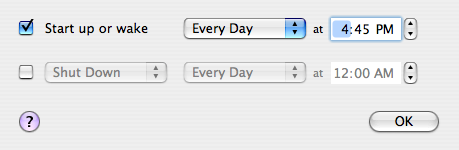
Set a schedule
Say OK to everything. You’re done. Congratulations! Your prudence will make you the envy of your colleagues.
It isn’t really hands off from here on out, just nearly so.
When they make you change your password twice a year, you will have to change the password in the first step too.
There are also some things you should not do. Do not turn off your computer when you leave for the day. Don’t log out or lock the screen. Anything that requires turning it on or logging back in will prevent SuperDuper! from doing its work. Putting the computer to sleep will be fine. So just walk away from the computer at the end of the day, let it fall asleep, and all will be well.
That’s about it. You can pretty much set it and forget it. Until you need it, that is.
Most of you don’t care about this section. Some might. That’s why it’s here.
I have assumed that you don’t keep a lot of personal material like pictures, music, and movies on your work computer. If you do, it’s good to have a copy of those files too. But you might have scruples about using Pomona’s servers to keep those copies. Or you might simply not have enough space up there regardless of your scruples.
I should say that I’m not aware of any policy forbidding using the server for personal material. I have been told that there is a limit of 10 GB for faculty, though I don’t know if that’s published anywhere.
If you want to exclude material from being copied, you need to modify SuperDuper!’s backup script. The instructions to do this are in the User’s Guide. You can find it under the Help menu in SuperDuper!
For various reasons, the sparseimage file in which your backup is stored can grow larger than you need. Do you care? Only if it grows larger than 10 GB. Then your friends at ITS will make you care.
You may need some assistance to do this because it involves using the Terminal application. But what you need to do is issue the following command:
hdiutil compact /Volumes/mjg14747/backup.sparseimage
Of course, replace mjg14747 with your username and backup.sparseimage with whatever your backup file’s name is. Again, you might not be comfortable doing this. But someone from ITS will surely be willing to help. It’s trivial, really.
